How to Generate Wildcard SSL Let's Encrypt with Certbot DNS Challenge (Complete Guide)
Introduction
A wildcard SSL certificate allows you to secure all subdomains with just one certificate, for example “*.example.com”, “subdomain.example.com”. With the help of Let’s Encrypt, we can obtain a free and automated SSL/TLS Certificate using Certbot through the DNS challenge method. However, keep in mind that the certificate is not valid for domain names using sub-subdomains such as sub.sub.example.com.
This method is very suitable if you have setups like:
- Public-facing HTTP infrastructure
- Internal server or private network
- Reverse proxy or load balancer
- Production environment with many subdomains
An SSL/TLS certificate functions to encrypt data sent between client and server so it cannot be intercepted (Man in the middle attack), maintain data integrity so it is not altered during transmission, increase user trust because the service appears more secure, and support modern protocols such as HTTP/2 and various API services that require secure connections.
Read Also: Convert PFX, CRT, and PEM Azure SSL/TLS Certificates
Prerequisites
Make sure:
- Linux server with root or sudo access
- Certbot is installed
- Access to DNS provider
- Active internet connection
Install Certbot (APT)
sudo apt update
sudo apt install certbot -y
Alternative Install Certbot via pip (Official Method)
Following the official Certbot guide for certain environments such as NGINX or systems that do not use the default package manager.
Install dependencies:
sudo apt install python3 python3-venv libaugeas0 -y
Create virtual environment:
python3 -m venv ~/certbot
Activate environment:
source ~/certbot/bin/activate
Install Certbot:
pip install certbot certbot-nginx
Create symlink for easier execution:
sudo ln -s ~/certbot/bin/certbot /usr/bin/certbot
Generate Wildcard Certificate Let’s Encrypt
certbot certonly --manual --preferred-challenges=dns -d *.example.com -d example.com
DNS Challenge Verification Process
Certbot will ask you to create a TXT record:
_acme-challenge.example.com TXT xxxxxxxxxxxxxxxxxxxxx
Steps:
- Login to DNS provider
- Add TXT record for @ record
- Wait for DNS propagation
- Press Enter to continue
- Usually Certbot will perform the second DNS Challenge and make sure the previous record is not deleted
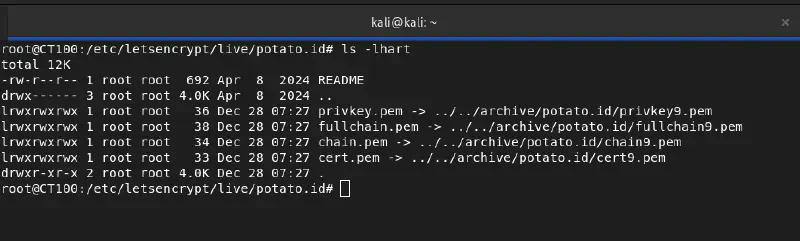
Certificate File Location
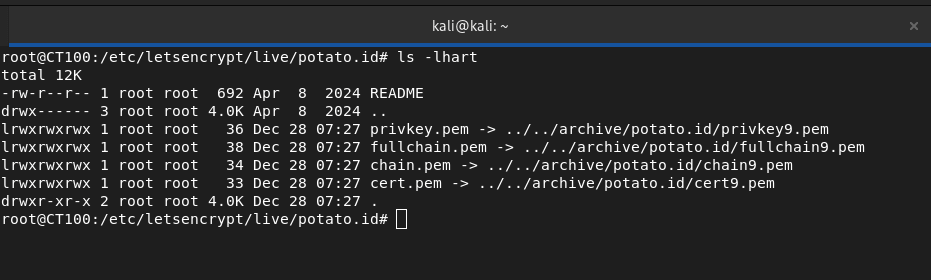
/etc/letsencrypt/live/example.com/
Important files:
- fullchain.pem : Contains the combined domain certificate (cert.pem) and intermediate certificate (chain.pem) in one file. This is the file most often used for server configuration (such as Nginx or Apache) because it already includes the full certificate chain needed for browsers to properly verify the connection.
- privkey.pem : The private key used for encryption and decryption processes in TLS connections. This file is very sensitive and must be kept secure because anyone who has it can impersonate your server.
- cert.pem : Contains the main certificate for your domain or wildcard domain issued by the Certificate Authority. This file only contains the server certificate without the intermediate certificate, so it is usually not used alone in production configuration.
- chain.pem : Contains the intermediate certificate from the Certificate Authority that links your domain certificate to the root certificate trusted by browsers. This file is required so clients can fully validate the certificate authenticity.
Check Certificate
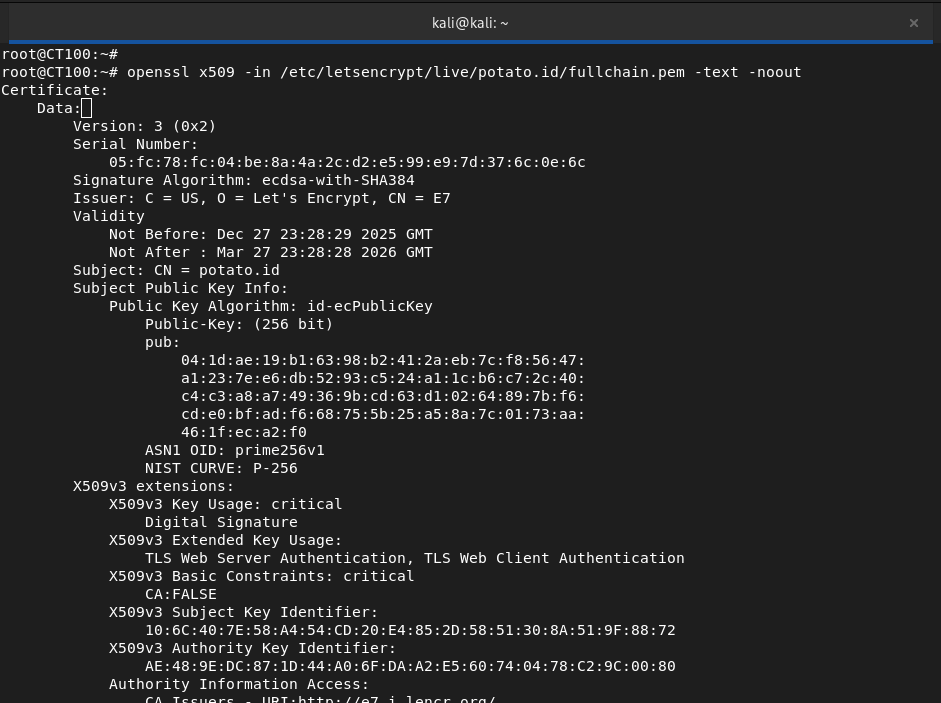
openssl x509 -in /etc/letsencrypt/live/example.com/fullchain.pem -text -noout
Renewal Certificate
certbot certificates
Because this is a manual method, renewal requires running the DNS challenge again before expiry (90 days). Or you can create a cronjob to perform automatic checks/updates
echo "0 0,12 * * * root /opt/certbot/bin/python -c 'import random; import time; time.sleep(random.random() * 3600)' && certbot renew -q" | tee -a /etc/crontab > /dev/null
But if using DNS validation we must install the certbot extension with our DNS Provider such as Cloudflare (python3-certbot-dns-cloudflare) or Azure (certbot certbot-dns-azure)
Best Practice Production
- Use DNS API for auto renewal
- Restrict private key permissions
- Monitor SSL expiry
- Backup /etc/letsencrypt folder
- Document renewal process
Troubleshooting
DNS Verification Failed
If DNS verification fails, we can validate using dig or nslookup
dig TXT _acme-challenge.example.com
You can also use whatsmydns.net
Make sure the TXT record is correct and propagation is complete before continuing to the second DNS verification, and ensure DNS infrastructure is in good condition.
Read also: Yes, It was DNS!
FAQ
Q1: What is a Let’s Encrypt wildcard certificate?
A1: A free SSL certificate from Let’s Encrypt that can secure all subdomains in one certificate (*.example.com).
Q2: What is Certbot DNS challenge?
A2: A domain verification method using TXT records in DNS, required for wildcard certificates.
Q3: How to auto-renew wildcard certificate?
A3: Use DNS API plugins (for example Cloudflare, Azure, AWS, Route53) so Certbot can automatically renew certificates.
Q4: Can HTTP challenge be used for wildcard?
A4: No, Let’s Encrypt only allows DNS challenge for wildcard certificates.
Q5: Where are SSL files stored in Linux?
A5: /etc/letsencrypt/live/example.com/ contains privkey.pem, cert.pem, fullchain.pem, and chain.pem.
Conclusion
Let’s Encrypt wildcard certificates with Certbot DNS challenge are a free and flexible solution to secure many subdomains. By understanding the generation, verification, and renewal process, you can maintain the security of data sent from server to client without high risk.