Guide to Configuring Email DNS Security (SPF, DKIM, DMARC)
Email is one of the most widely used communication methods, but it is also vulnerable to attacks such as spoofing, phishing, and spam. Therefore, implementing SPF, DKIM, and DMARC is very important to improve the security of the email we own. The following is a configuration guide for SPF, DKIM, and DMARC to improve email security.
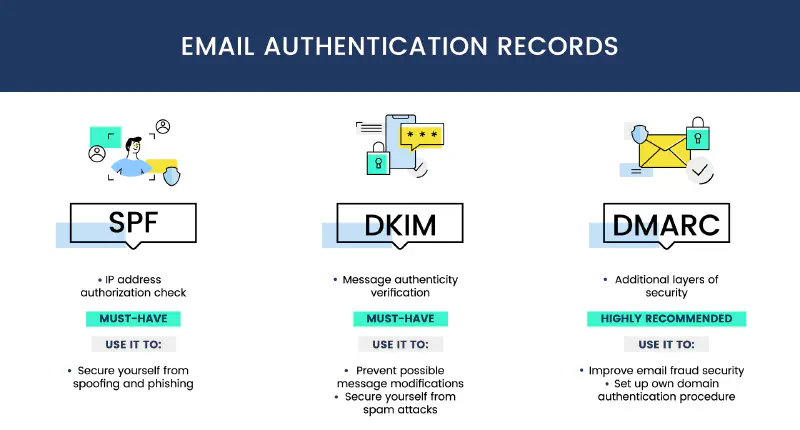
Sender Policy Framework (SPF)
What is SPF?
Sender Policy Framework or SPF is an email authentication mechanism that allows a domain to determine which servers are authorized to send email on behalf of the owned domain. This configuration allows the receiving server to verify that the received email originates from a server authorized by the sending domain, and this configuration is applied to the DNS TXT record of the sending domain.
How to Configure SPF:
- Access the DNS Domain Console (Cloudflare, AWS Route 53, or other DNS providers).
- Add or update the SPF record in DNS with the following format:
v=spf1 include:_spf.google.com ~allv=spf1→ Indicates that this is an SPF record.include:_spf.google.com→ Allows Google servers (Gmail) to send email on behalf of the domain that we own (of course according to the email provider used or the IP Address used as the SMTP Sender).~all→ Indicates that email from unauthorized servers will be given a soft fail status.
- Save the changes with the default TTL or according to your needs and wait for DNS propagation (usually takes several hours).
DomainKeys Identified Mail (DKIM)
What is DKIM?
DomainKeys Identified Mail or DKIM is an email authentication method that allows a domain to sign emails sent from the sending server. This process is performed using a public key and a private key. The public key is stored in DNS and the private key is stored on the sending server, so that every email sent will be signed by the sending server and the receiving server will verify the signature using the public key available in DNS.
How to Configure DKIM:
- Enable DKIM in the Email Provider used (for example Gmail, Microsoft 365, Mailgun, or Zimbra).
- Obtain the DKIM public key provided by the email service used.
- Add a TXT record in DNS with the following format:
default._domainkey.example.com TXT "v=DKIM1; k=rsa; p=MIGfMA0..."default._domainkey→ Selector provided by the email provider (adjust according to the provider configuration).v=DKIM1→ Indicates that this is a DKIM record.p=MIGfMA0...→ Public key used for verification.
- Save the changes with the default TTL or according to your needs and wait for DNS propagation (usually takes several hours).
Domain based Message Authentication, Reporting, and Conformance (DMARC)
What is DMARC?
Domain based Message Authentication, Reporting, and Conformance or DMARC is an email authentication standard that combines SPF and DKIM. This is implemented by adding a DMARC record in DNS according to the configuration provided by the domain owner. Generally, DMARC configuration is used to determine the policy action that will be taken by the receiving server if an email fails SPF or DKIM authentication.
How to Configure DMARC:
- Add a TXT record in DNS with the following format:
_dmarc.example.com TXT "v=DMARC1; p=quarantine; rua=mailto:[email protected]; ruf=mailto:[email protected]; pct=100"v=DMARC1→ Indicates that this is a DMARC record.p=quarantine→ Emails that fail authentication will be quarantined.rua=mailto:[email protected]→ Email address to receive DMARC reports.ruf=mailto:[email protected]→ Email address for authentication failure reports.pct=100→ Applies to 100% of sent emails.
- Save the changes with the default TTL or according to your needs and wait for DNS propagation (usually takes several hours).
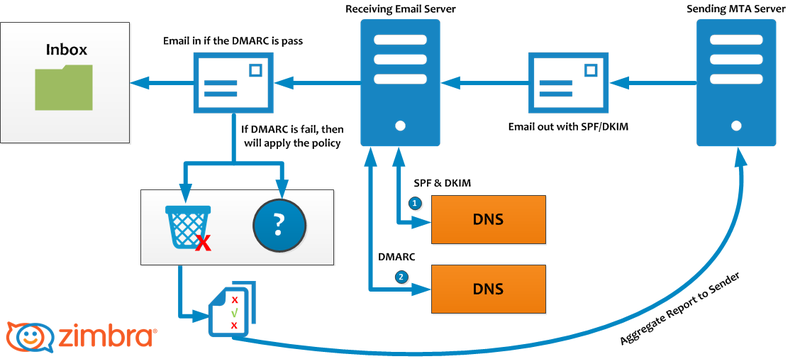
The image above explains how email is sent and verified using SPF, DKIM, and DMARC:
- Email Sending:
- Email is sent from the Sending MTA Server with the SPF/DKIM header.
- The receiving server checks DNS to validate SPF and DKIM whether it matches the configuration on the DNS Server.
- Email Verification:
- If SPF and DKIM are valid, the email is forwarded to the Receiving Email Server.
- If it fails, the DMARC policy that has been created will be applied.
- DMARC Enforcement:
- If the email passes DMARC, the email goes to the recipient Inbox.
- If it fails, actions such as quarantine or reject are applied.
- DMARC reports are sent back to the sender for security analysis.
Conclusion
By implementing SPF, DKIM, and DMARC, we can:
- Prevent email spoofing and phishing
- Ensure that sent emails are properly received by the receiving server
- Protect the email domain reputation from blacklist and spam
Make sure to check the configuration using tools such as:
Or you can read this article to validate the SPF, DKIM, and DMARC configuration that has been created: Validasi Konfigurasi SPF, DKIM, DMARC.
With proper configuration, email security will improve and the risk of phishing attacks will decrease while the reputation of the email domain will be maintained.